How to Use Keyframes in CapCut
Mastering how to add keyframe in capcut separates static slideshows from dynamic social edits that feel professionally motion-designed. Keyframes store property values—position, scale, rotation, opacity, and more—at specific times so CapCut animates smoothly between them. Use them for Ken Burns zooms on photos, sliding text, pulsing logos, and speed ramps that hit on the beat. This guide explains the keyframe button, which properties animate, how to combine moves without nausea, and export tips for smooth motion. If CapCut is not on your device yet, install it via our CapCut download hub. Desktop creators get more screen space for curves and timelines—read CapCut for PC for layout differences. Cap Cut Pro rarely gates basic keyframing; the how to add keyframe in capcut workflow is available to most free users and pairs well with other advanced CapCut tutorials on green screen, reverse, and text effects. By the end you will animate confidently without leaving mobile for desktop motion tools. We also cover common mistakes—keyframes that do not stick, jittery zooms, and opacity fades that vanish on bright screens—so you can troubleshoot without starting over. You will leave with a repeatable workflow for intros, b-roll moves, and call-to-action animations that look deliberate on every upload. Practice the diamond icon on text and video layers until adding keyframes becomes muscle memory across phone and desktop layouts.
Related: download · tutorials · features · for-pc · homepage

Keyframe Basics
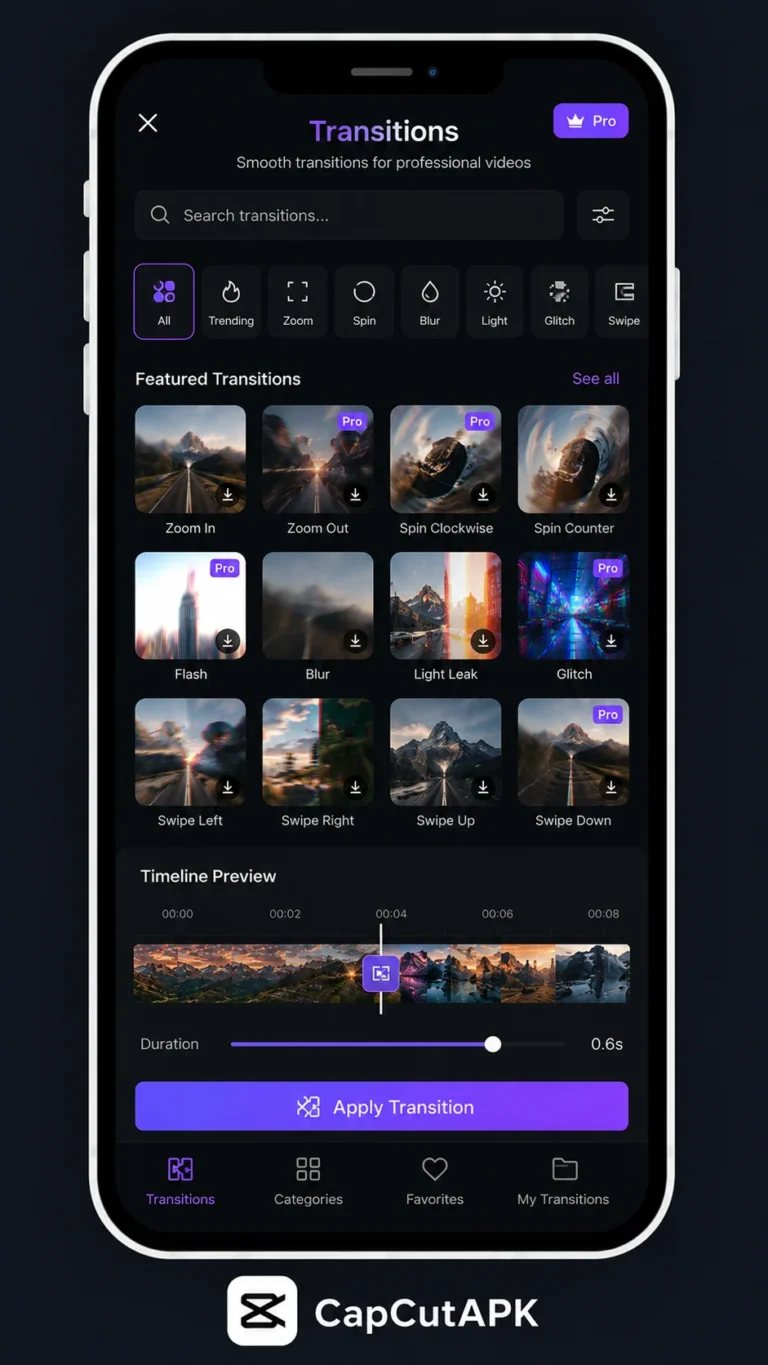
Select a clip, text layer, or sticker, open the Basic or Transform panel, and tap the keyframe diamond icon. Move the playhead, change a property—scale, position, rotation, opacity—and CapCut records a new keyframe. Playback interpolates between points, creating motion without manual frame-by-frame edits. Delete keyframes by returning to a point and clearing values or using undo. Keyframes attach to individual layers, so multi-layer parallax requires setting points on both background and foreground separately. Start simple: two keyframes on scale from 100 to 110 percent across three seconds yield a gentle push-in.
Add rotation only after position and scale feel good; too many properties at once confuse timing. Enable grid overlays to align moves. Our features overview shows which elements support keyframes beyond video—text and stickers included. If keyframes seem missing after an update, ensure the layer is selected and the playhead is not on a frozen still image track without transform enabled. Save versions before experimental animation passes.
Preview at full screen; small preview windows hide jitter from handheld footage. Stabilize shaky video before keyframing zooms, or compound motion may feel seasick. Teach collaborators to look for the diamond icon lit on layers that already contain animation data.
Think of keyframes as bookmarks in time: each diamond stores what a layer should look like at that moment, and CapCut fills the gaps. New editors often add too many points early—two well-placed keyframes usually outperform six wobbly ones. Use the timeline zoom controls to place points on exact frames when syncing to music. If you collaborate, leave notes on layers describing what each keyframe block animates so teammates do not delete motion by accident.
CapCut also lets you keyframe stickers and logos on top of video, which is how many creators build animated channel branding without After Effects. Duplicate a successful animation into the next project rather than rebuilding from zero each week.
Position and Zoom
Position and zoom keyframes power Ken Burns effects on still photos and dramatic pushes on video. Set keyframe one at the start with scale 100 and centered position; at the end, increase scale slightly and offset position toward the subject’s eyes. Keep motion direction consistent—zoom in and drift one way, not back and forth. For vertical video, favor vertical panning that follows walking subjects rather than horizontal drift that fights the frame. Combine zoom with crop if the subject nears the edge—crop keyframes are limited, so shoot with headroom when possible.
Easing may be linear in mobile CapCut; simulate ease by adding a middle keyframe closer to the end for deceleration. On photo slideshows, vary zoom direction per slide to avoid monotony. Pair slow zooms with subtle rotation—one or two degrees total—for luxury product shots. Test on mute; motion that feels slow with music may feel dead without it.
When animating screenshots for tutorials, keyframe position to pan across UI elements in sync with narration. Keep text labels outside the animated crop so they remain legible. Export at 60 fps for smoother Ken Burns on high-resolution stills.
Ken Burns is the gateway drug to motion design: once you nail a slow zoom, try pairing it with a slight pan in the opposite direction so the frame feels alive without dizzying the viewer. For talking-head clips, subtle push-ins during emphasis words draw attention without cheesy punch-ins. Avoid zooming past 120 percent on 1080p phone footage or noise becomes obvious. When photos are lower resolution, scale less and pan more to hide softness.
Opacity
Opacity keyframes fade layers in and out. Set opacity to zero at the start, one hundred at one second, hold, then fade out at the end for classic title cards. Watermarks can appear mid-video by keyframing from zero to fifty percent opacity during a call-to-action window. Pair opacity with position so text slides up while fading in—two properties, four keyframes total, big polish payoff. Avoid fading entire video clips unless for flashback transitions; usually opacity animates on text and overlays.
When stacking semi-transparent layers, background brightness affects perceived fade—test on dark and light scenes. Use opacity instead of harsh cuts for gentle scene changes in vlogs. Duplicate text layers with staggered opacity keyframes for karaoke-style lyric reveals. Keep fade durations between three hundred and eight hundred milliseconds for snappy social pacing.
If fades look stepped rather than smooth, add intermediate keyframes every few frames. Check export gamma on OLED phones—very low opacity text can disappear entirely on bright outdoor screens.
Opacity fades work best when paired with motion—static text that only fades feels dated. Slide text ten pixels while fading in for modern title sequences. For lower-thirds, fade to seventy percent opacity instead of full transparency so names remain readable over busy footage. Test fades against both dark and bright backgrounds in the same video; a fade that works on chapter one may vanish on chapter two.
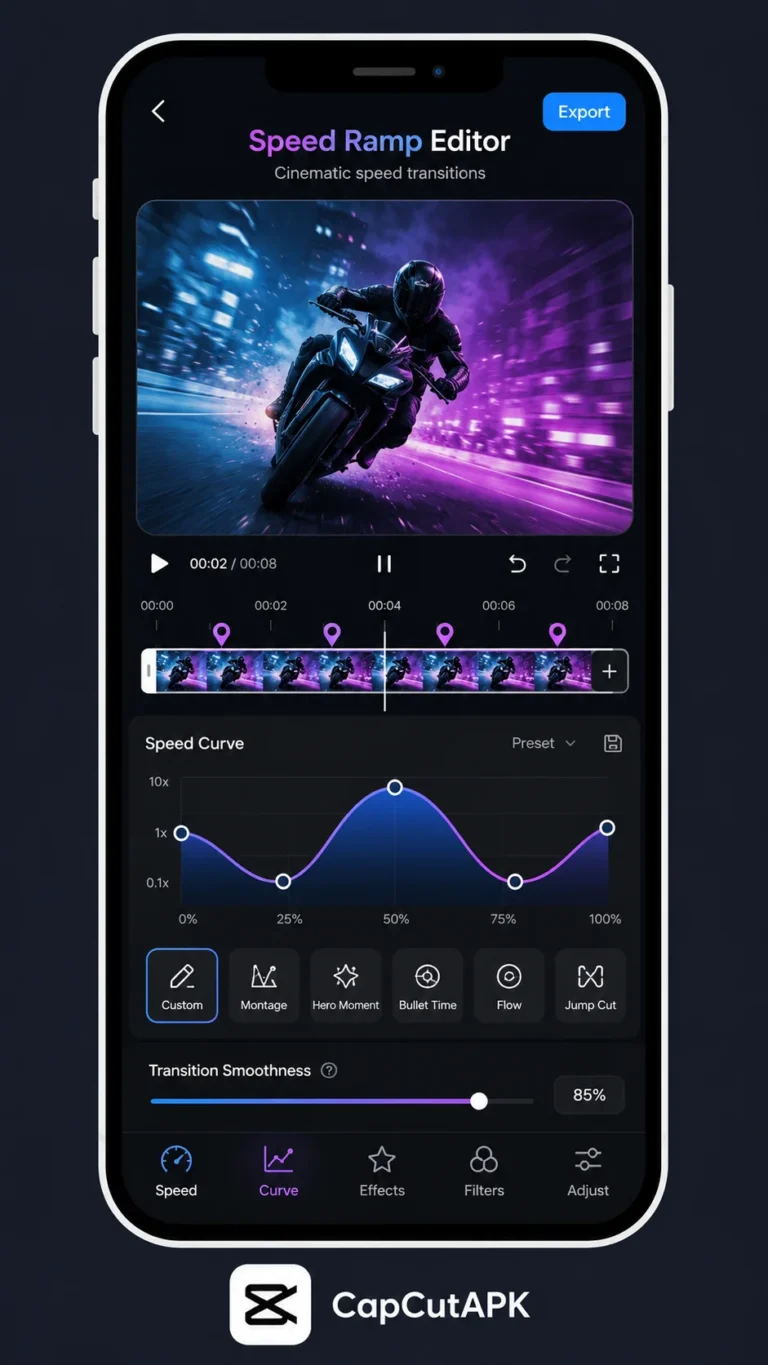
Speed
Speed keyframes—or speed curves on supported builds—ramp playback rate over time. Start normal, accelerate into an action beat, then slow for impact. Combine with reverse segments from our reverse video guide for highlight reels. Heavy speed ramps affect audio pitch unless detached; mute clip audio and design sound separately when ramps are extreme. Test export because preview smoothness may not match final render on low-end hardware.
Limit speed extremes on 4K clips to prevent dropped frames. When speed keyframes feel jumpy, add intermediate keyframes every few frames of the ramp section. Sports and dance edits use speed ramps to emphasize landings; product demos slow zooms on details. Match ramp timing to music transients marked on the timeline.
Document speed values per clip when building templates so weekly episodes stay consistent. Avoid stacking speed ramps with heavy filters on the same layer—split work across duplicate clips if previews choke.
Speed ramps reward planning: mark the beat on the timeline before you touch curves, then place ramp keyframes a few frames ahead of the hit so acceleration feels anticipatory. If audio pitch warbles, detach sound and replace with forward SFX. Combine mild speed ramps with position keyframes only after each effect previews cleanly alone—stacking too many transforms on weak phones causes stutter in export.
Combined Moves
Professional motion stacks keyframes across properties and layers. Example: background scales slowly while foreground text slides and fades in, logo rotates five degrees and settles, all during a two-bar music intro. Build in passes—animate position first, then add opacity, then rotation. Solo layers by hiding others to verify each move. CapCut does not replace After Effects, but combined keyframes cover most Shorts needs. Copy keyframes by duplicating layers when the app lacks paste-motion attributes.
Templates save time: build one intro animation, duplicate for episodic series. Sync combined moves to CapCut export presets at 60 fps for smoother rotation than 30 fps when logos spin quickly. If motion feels mechanical, vary timing so not every element starts on frame zero—offset text keyframes five frames after background moves. Subtle asymmetry reads as human-designed.
Review animations on the smallest screen your audience uses; aggressive zooms that work on tablets may overwhelm phone viewers. Lock finished motion layers before handing projects to teammates who might nudge clips accidentally.
Combined moves are where CapCut punches above its weight for Shorts. Build a reusable intro project: background drift, logo scale, tagline fade—then duplicate weekly. Offset layer start times so elements cascade instead of popping simultaneously. When exporting, 60 fps makes rotation smoother than 30 fps for quick logo spins. Review on mute; if motion still reads clearly, your animation is strong enough for sound-off feeds.
Frequently Asked Questions
Download CapCut Mod APK
Master how to add keyframe in capcut with premium tools unlocked. Download CapCut Mod APK.