How to Remove Background in CapCut
A reliable capcut video background remover lets you isolate subjects without leaving the editor for desktop compositing software. CapCut combines AI cutout, chroma key, and manual refinement brushes so you can drop presenters onto custom backdrops, clean up messy rooms, or build thumbnail cutouts from still frames. This tutorial walks through every stage: importing footage, choosing between AI Remove Background and green-screen keying, fixing hair edges, and placing replacement layers beneath your subject. Whether you shoot on a phone or import from a DSLR, the same timeline rules apply—subject on top, new background underneath, preview often, export at full resolution. New users should grab the app from our CapCut download page first. If you already edit on a larger screen, see CapCut for PC for where cutout tools sit in the desktop layout. Cap Cut Pro may speed up AI processing on some devices, but the capcut video background remover workflow is accessible to free-tier creators tackling Shorts, reels, and presentation clips. Expect to spend as much time on lighting and edges as on tapping buttons—great keys are shot and refined, not magically fixed in one click.rting footage through export. The capcut overlay panel also helps layer graphics above a background remover capcut cutout for thumbnail edits.
Related: download · tutorials · features · for-pc · homepage

AI Background Removal
CapCut’s AI background removal analyzes each frame to separate people and objects from scenery without requiring a green screen. Select your clip on the timeline, open the Video or AI tools panel, and tap Remove background or Cutout. The app processes the shot—longer clips take more time—and applies a mask you can preview immediately. AI works best when the subject contrasts with the background, lighting is even, and edges are sharp. Busy patterns behind hair or motion blur can confuse the model, so expect to refine results with brush tools afterward. Shoot subjects several feet in front of walls when possible so depth blur separates them from clutter.
Use AI cutout for vlogs recorded at home, product demos on neutral walls, and quick social stickers extracted from video. It is faster than manual rotoscoping for short-form content, though not every shot qualifies. If the subject wears colors similar to the backdrop, switch to controlled green screen capture instead. For a full feature tour beyond cutout, explore our CapCut features list to see how masks interact with effects and filters. AI removal often needs internet access, so download critical assets before editing on planes or in low-signal studios.
After AI runs, zoom the preview to 100 percent and scrub frame by frame near shoulders, hair, and fast hand movements. Flickering masks often mean the source footage is compressed heavily—re-export from the camera app at higher bitrate if possible. Save a duplicate project before aggressive edits so you can revert. On long clips, split into segments and process separately if the app times out or overheats the phone.
Before you tap Remove background, trim dead air at the head and tail of clips so AI processes only usable footage—shorter jobs finish faster and overheat phones less. Shoot with separation in mind: plain walls, solid shirts, and rim light on hair all help the model. If you plan heavy compositing, capture in 1080p even when exporting vertical 9:16 so you have pixels to crop. Batch similar shots in one project to reuse background plates and color grades.
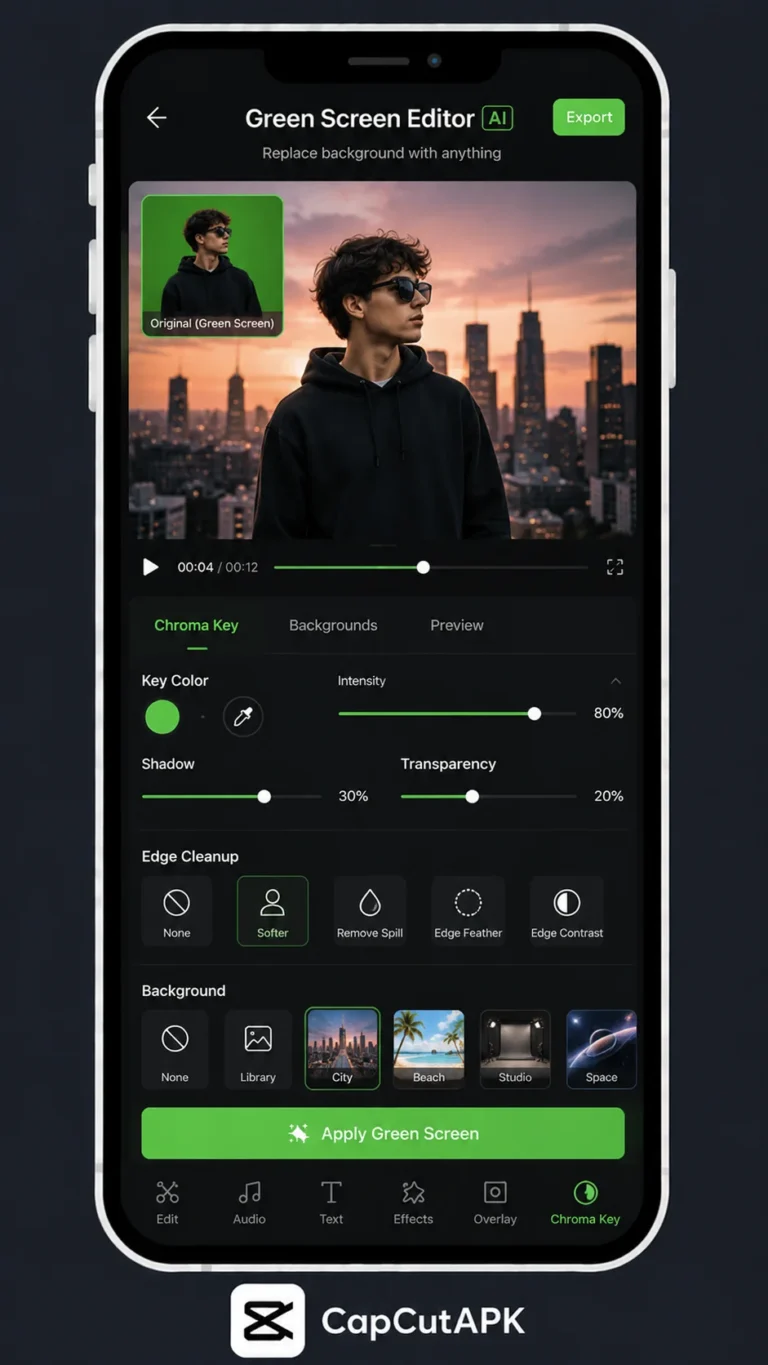
Chroma Key
When you shoot on green or blue screen, chroma key often beats AI for clean edges. Import the footage, go to Effects, choose Chroma key, and sample the backdrop color with the eyedropper. Adjust intensity, shadow, and edge feather until the background disappears without eating into clothing. CapCut’s chroma tools are the same family used in the green screen tutorial, so skills transfer between articles. Spill suppression reduces green reflections on skin—critical when talent stands close to the backdrop. Blue screen helps when wardrobes include green; sample blue instead and tune tolerance separately.
Chroma key shines for studio setups, streaming overlays, and repeatable brand backgrounds. Unlike AI, it does not require cloud processing for the key itself, which helps on slower connections. Wrinkled fabric, uneven lighting, and shadows on the screen create blotchy keys—iron the cloth, light it separately from the subject, and keep talent several feet forward. If wardrobe matches the screen color, switch to blue screen or change clothes before reshooting saves hours in post.
Combine chroma with a replacement image or video on a lower track. Scale the background to fill the frame without cropping important subject motion. Add a slight blur to distant backgrounds so composites feel photographic rather than sticker-like. Test keys with a gray solid behind the subject while tuning so white or black backdrops do not hide fringe problems.
Chroma key rewards discipline on set. Label clips in your camera roll as GREEN or BLUE so you do not key the wrong color in a hurry. When talent gestures widely, verify the hand never leaves the screen area—fingers that clip the frame edge are painful to fix. Store a still photo of your empty screen plate; some advanced workflows use it for spill reference, and it helps you notice when wrinkles crept in mid-shoot.
Edge Cleanup
Even strong AI or chroma passes need edge cleanup. Open the cutout refinement brush and paint areas to include or exclude from the mask. Feather softens harsh outlines; contrast adjustments help semi-transparent regions like flyaway hair. Work in short bursts on problem frames rather than global changes that wobble across the clip. For fuzzy hair, slightly increase feather and accept a thin halo over chopping strands unnaturally. Zoom to 200 percent on problem frames—what looks fine at thumbnail scale often fails on full-screen Shorts.
Compression artifacts show up as jittery edges—denoise the source clip lightly before cutout if CapCut offers noise reduction on your build. Avoid over-sharpening prior to removal; sharpen after compositing instead. When subjects move quickly, split the clip at motion spikes and apply slightly different brush fixes per segment. This is tedious but faster than restarting the shoot. Use matte preview modes if available to see alpha errors clearly.
Preview on a mid-gray background while editing; pure white or black hides fringe problems. Toggle the background layer on and off to catch holes in the mask around fingers and chair backs. Lock finished mask layers so accidental taps do not reset your work. Document brush settings that worked for future episodes with the same set.
Edge cleanup is where amateur composites become credible. Work at consistent zoom levels—jumping between 100 and 400 percent makes brush strokes uneven. For flyaway hair, paint exclusion strokes on only the worst frames; neighboring frames often interpolate well enough. Take breaks; staring at green halos for an hour leads to over-feathering that makes subjects look like ghosts.
Replace Backgrounds
Once the subject is isolated, drag a photo or video beneath the cutout layer on the timeline. Match perspective: if the camera angle is low, choose backgrounds shot from a similar height. Color-grade the backdrop toward the subject’s lighting—warm indoor talent on a cool beach plate looks fake until you tint shadows. Add a subtle shadow under feet or products to ground them in the scene. CapCut opacity and blur tools help push distant backgrounds out of focus. Align horizon lines so viewers are not distracted by tilted virtual worlds.
Stock libraries inside CapCut speed up replacements, but custom brand assets keep content recognizable. Scale backgrounds larger than the frame, then animate slow position keyframes for parallax motion. For thumbnails, export a still frame after compositing rather than screenshotting the preview, which may use lower resolution. When replacing with video loops, trim the background to match subject clip length and hide loop seams with foreground motion or brief flashes.
When replacing with ambient audio on stock clips, mute unrelated sound unless it supports the story. Return to our CapCut home hub for export presets that balance file size and edge detail. Flatten composites only after client approval—keep layered projects for revisions.
Background replacement is half color science. Match black levels between subject and plate or shadows look pasted. Warm indoor skin against a cool exterior background needs a gentle orange lift on the backdrop or a slight cool tint on the subject—not both extremes. Add grain uniformly if phone footage is noisier than stock video so textures match.
Limits
Every capcut video background remover has limits. AI may fail on glass reflections, fine net hair, or subjects blending into similarly colored walls. Long 4K clips stress RAM on mid-range phones—close other apps and export in segments if the app crashes. Some AI cutout features need internet and may watermark or throttle on free accounts depending on region. Transparent ProRes-style alpha exports are uncommon; CapCut usually flattens video, so plan backgrounds inside the project before delivery.
Hair, motion blur, and low light remain the hardest cases. Filming with more separation, adding rim light, and shooting at higher shutter speeds reduces pain in post. If quality must be broadcast-grade, consider filming green screen and keying manually rather than one-tap AI. Compare mobile results with desktop in our PC guide when clients demand pixel-perfect mattes. Set expectations with stakeholders: social Shorts tolerate small halos; TV spots may not.
Document what worked: note lighting setup, AI versus chroma choice, and feather values so you can repeat success on the next shoot. Save template projects with empty background slots for weekly content batches. When a shot is unsalvageable, reshoot a pickup against a plain wall rather than fighting garbage footage for hours.
Know when to stop fighting: if AI cutout fails on glass, mesh fabric, or motion blur, reshoot with simpler backgrounds or green screen rather than delivering halos to clients. Export tests at target resolution before final grading—compression reveals edge problems previews hide. Archive project files with labeled layers so you can swap backgrounds for seasonal campaigns without re-keying.
Frequently Asked Questions
Download CapCut Mod APK
Master capcut video background remover with premium tools unlocked. Download CapCut Mod APK.